
 The latest project for Hostess Club is Scrapbooking on Canvas. This fun and simple project is a great way to take your altered art to the next level while creating a unique way to display "pages".
Supplies needed for this project include:Mod PodgeAcrylic Paint to match papersCardstock, Background/Texture PaperStampsInks matching papersFoam Brushes for paint and mod podgeEmbellishments

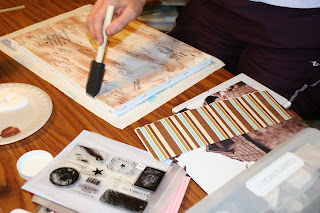
Step 1: Paint your canvas. For this canvas, I wanted some of the original canvas to show. You can cover the entire canvas, however. (Please note that painting the canvas is not necessary; using the canvas is fine as well.)

Step 2: After first coat of paint dries, add second coat if you're using more than one color. Additional coats may be needed if you are coating the canvas in a solid color all over.

Step 3: Stamp images on the canvas. Keep in mind what pictures will be covering the images so you can use stamps that will read best and be seen. Another helpful tip is to place something solid below the canvas so when you press the stamp into it, it does not sag (leaving a partial stamp). Remember, if you're using acrylic stamps, you'll need to place a piece of foam between the solid item and the canvas. Allow ink to dry thoroughly before mod podge is applied.

Step 4: Distress with ink. This step is optional, but added to the theme of my canvas. Again, allow ink to dry thoroughly.

Step 5: Plan the layout of your pictures on the canvas.

Step 6: Apply mod podge for first layer. I only applied mod podge to a section so it wouldn't dry before I had all the pieces in place. Make sure mod podge completely covers the area your placing an item.

Step 7: Apply mod podge over each layer to smooth onto canvas. Make sure both the top and bottom of the piece is thoroughly covered in mod podge. Smooth any air bubbles from paper or they will wrinkle on your project. An old credit card works great for this task.

Step 8: Continue placing items on your canvas, building the "page". Work in sections and layers.


Step 9: Modge podge each time an item is placed on the canvas. Again, be sure to cover both sides of an item with mod podge and smooth wrinkles.

Step 10: Allow mod podge to dry thoroughly and then recoat. Once second coat is dry, add embellishments such as ribbon or brads. Use a piercing tool to poke through the canvas (be mindful of the frame).

A neat distressing techniqu I discovered in this project is using a touch (and I do mean a SMALL touch) as I swiped the second coat of mod podge. It gave the canvas an additional aged look.
All products used to make this piece were from Close to My Heart.
X7086B Caprice Level 2 Paper Packet
Z2111 Chocolate Exclusive Inks Stamp Pad
Z2105 Black Exclusive Inks Stamp Pad
Z2103 Bamboo Exclusive Inks Stamp Pad
X5760 Winter Cozy Textured Cardstock Combo (Crystal Blue used)
Z1301 Chocolate Collection Ribbon Rounds
Z291 Hinges (Copper used)
Z299 Basic Collection Bigger Brads (Copper used)
Pictures were taken at the Brick Barn Inn, Topeka, KS

5 comments:
What a beautiful canvas! I love it!
WOW!! I've seen those canvas at walmart and have thought about it, but never thought of layout on it!! that's really adorable one! thanks for showing us!!
Neat canvas. Did you modge podge over your picture? I read that you shouldn't cover photos with modge podge, as it will change their color and ruin them.
Amy
Hi Tish,
I really like your scrapbooking style. I just stumbled upon your blog while I was "google"-ing some scrapbook designs. I am looking for ideas for the holidays.
I live in London and finding scrapbook supplies isn't as easy as it used to be when I lived in CT. If you have any ideas or suggestions, feel free to drop me a line at natashah_global@yahoo.co.uk
Thanks,
Natasha H
It was certainly interesting for me to read this blog. Thank you for it. I like such topics and anything connected to this matter. I would like to read more soon.
Post a Comment