Saturday, December 1, 2007

My Try at Digital Scrapbooking

While I'm a die-hard papercrafter, I also love the computer. In my previous life as a high school English/Journalism teacher, I worked with Photoshop and Pagemaker. I loved making the pages come alive from the designs in my head. I love staying home with my children, but sometimes I miss the technical projects I did when I worked. Digital scrapbooking was just the thing to give me my fix. I won't replace all my scrapbooking with digital, but I do like that I can take the laptop on a trip and that's the only tool I need. It fulfills my incessant need to be doing something all the time (is that normal???). Anyway, here's my first creations...


Posted by Picasa

Saturday, November 3, 2007

Scrapbook on a Canvas

The latest project for Hostess Club is Scrapbooking on Canvas. This fun and simple project is a great way to take your altered art to the next level while creating a unique way to display "pages".


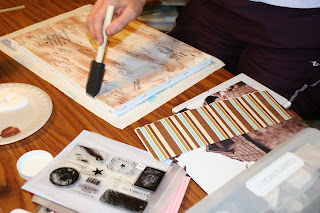


Supplies needed for this project include:Mod PodgeAcrylic Paint to match papersCardstock, Background/Texture PaperStampsInks matching papersFoam Brushes for paint and mod podgeEmbellishments


Step 1: Paint your canvas. For this canvas, I wanted some of the original canvas to show. You can cover the entire canvas, however. (Please note that painting the canvas is not necessary; using the canvas is fine as well.)


Step 2: After first coat of paint dries, add second coat if you're using more than one color. Additional coats may be needed if you are coating the canvas in a solid color all over.


Step 3: Stamp images on the canvas. Keep in mind what pictures will be covering the images so you can use stamps that will read best and be seen. Another helpful tip is to place something solid below the canvas so when you press the stamp into it, it does not sag (leaving a partial stamp). Remember, if you're using acrylic stamps, you'll need to place a piece of foam between the solid item and the canvas. Allow ink to dry thoroughly before mod podge is applied.


Step 4: Distress with ink. This step is optional, but added to the theme of my canvas. Again, allow ink to dry thoroughly.


Step 5: Plan the layout of your pictures on the canvas.


Step 6: Apply mod podge for first layer. I only applied mod podge to a section so it wouldn't dry before I had all the pieces in place. Make sure mod podge completely covers the area your placing an item.


Step 7: Apply mod podge over each layer to smooth onto canvas. Make sure both the top and bottom of the piece is thoroughly covered in mod podge. Smooth any air bubbles from paper or they will wrinkle on your project. An old credit card works great for this task.


Step 8: Continue placing items on your canvas, building the "page". Work in sections and layers.


Step 9: Modge podge each time an item is placed on the canvas. Again, be sure to cover both sides of an item with mod podge and smooth wrinkles.


Step 10: Allow mod podge to dry thoroughly and then recoat. Once second coat is dry, add embellishments such as ribbon or brads. Use a piercing tool to poke through the canvas (be mindful of the frame).


A neat distressing techniqu I discovered in this project is using a touch (and I do mean a SMALL touch) as I swiped the second coat of mod podge. It gave the canvas an additional aged look.
All products used to make this piece were from Close to My Heart.
X7086B Caprice Level 2 Paper Packet
Z2111 Chocolate Exclusive Inks Stamp Pad
Z2105 Black Exclusive Inks Stamp Pad
Z2103 Bamboo Exclusive Inks Stamp Pad
X5760 Winter Cozy Textured Cardstock Combo (Crystal Blue used)
Z1301 Chocolate Collection Ribbon Rounds
Z291 Hinges (Copper used)
Z299 Basic Collection Bigger Brads (Copper used)

Pictures were taken at the Brick Barn Inn, Topeka, KS

Posted by Picasa

Sunday, September 16, 2007

A Kansas Sunset

Anyone who's never driven through Kansas in late summer has missed a truly beautiful place to visit. Personally, I get tired of the bad rap Kansas gets for supposedly being a flat, uninhabitable place where there is no beauty.

Kansas is full of beauty...if you get off the interstate and experience it. (A little bit of trivia: the first stretch of interstate was laid in Kansas and part of that stretch had to have at least a 1 mile stretch of straight road so if a plane needed to land, there was a place for it to do so. Therefore, the stretch of I-70 that spans the state of Kansas is pretty boring to drive because it SEEMS the state is nothing but flat. Anyway, back to origianlly scheduled programming...)

The picture to the right was taken at Cedar Bluff Resevoir just as the sun dipped below the rolling hills and bluffs surrounding the lake. The wind was blowing just enought to create a lapping wave on the sandy shore of the swimming area. While the shore is lost in the evening shadows in the picture, the grass was a vivid green and the sky full of blues, grays, reds, oranges, and reds. A hint of brown dawned the tips of the tall blades of grass as the middle of August had born it's heat just enough to sap the edges of moisture.

This resevoir was created in the 1950's when a dam was built between the walls of bluffs in a valley. (So explain to me how Kansas is flat if they could close off a valley!) It's mostly flooded timberland and a great place to fish because there is great habitat for freshwater aquatic life. It's a hidden retreat, 15 miles south of the interstate on a state highway.

Oh, by the way, I don't know if I've mentioned I'd like to be a photographer someday. I enjoy covering my face with the body of my camera, peering through the lens and creating a scene, visible only through the lens. Based on how I focus, I can create a widespan or a close-up view of what is reflected in the little mirror in the body of the camera. What is burned on the digital chip of my memory card is what I choose. Fortunately, God has given me a full array of possible canvases and individuals to capture on my memory card.

Thursday, September 13, 2007

And now, the rest of the story...

(The continuation of "About Me" since I'm only allowed 1200 characters.)

The question I get most often about my e-mail signature tag is "What is a Domestic Homefront Coordinator?" Nevermind that I have my website for my direct sales business on there nor my information about how I'm an Independent Consultant for Close to My Heart.
So here's an answer to that question: A few years ago, I think even before I became a mom, I received an e-mail about how this lady went to get her driver's license. When she got to the section about occupation, she wasn't sure what to write since she was a stay-at-home mom and homemaker. Neither of these titles seemed to fit all she really did, plus society's connotation of the terms left a mindset that she really didn't work. So on the line for occupation, she squeezed in all the titles that fall under the previous mentioned. Chef, taxi driver, school classroom volunteer, daycare provider, teacher, nurse, doctor, mediator...the list went on.
While I appreciated the e-mail when it came, I did not fully understand the magnitude of what a woman does when she stays home to raise her children. Being in the "politically correct" era in America, I couldn't help but create my own title to describe just what it is I do. While there are many facets to the job, it isn't one I'd trade any time soon. I saw on someone's signature line once the following quote: "Stay-at-home mom is the hardest, most rewarding job I don't get paid to do." Enough said.
Oh, and a little more about me other than I'm a Domestic Homefront Coordinator. I am a scrapbooker/stamper and an Independent Consultant for Close to My Heart. I am also the web coordinator for Engravingshop.com as well as the VP of Membership for MOMS Club of Hays, Ellis Public Library Board of Trustees member, Children's Time teacher at Ogallah Christian Church, and teacher/designer for Scrapbook Frenzy. I have a Fantasy Football team...well, two actually; I like to attend auctions and garage sales because a good deal is too hard to pass up; I'm not afraid of a power tool; love to cook and bake; am thinking about taking up knitting even though I already have too much on my plate; value friendships; and have a secret desire to become a writer (partly why I created this blog). I have a million thoughts in my head that I'd love to share, just need an outlet. In my previous career I was a teacher, most recently at a Catholic high school. I taught English and Journalism and found both parallel with my love for scrapbooking and writing.
Well, that's about it. What I've missed here, I'll add in my daily blogs.